


Content Summary
In this article, we will be discussing the basics of the golf swing and the various components of successful golf swings.
Identify the golf club
Before attempting to tackle your golf swing, it is important to identify the golf club you are using. The type of club that you use will greatly influence how you approach the game and your form in swinging the club. The clubs with longer shafts affect the way that you stand and move around and it is important to adjust accordingly.
The basic types of clubs include woods, irons and putters. Woods are designed for long-distance shots, irons are designed for mid and short-distance shots, while putters are used mainly on or near the green to roll the ball along the ground or into a cup.
When planning your golf swing positions, remember to first identify what type of shot you must make by assessing distance, obstacles in between and potential hazards in order to select a suitable club and comfortable grip.
Understand the golf stance
Before a golf swing can begin, a proper stance must be established. A golf swing stance is the foundation of the entire swing and can determine whether or not your shot ends up hitting its target. It also affects balance, consistency and accuracy throughout the entire swing.
Establishing the ideal stance for your individual build and style of play is important for proper power, speed, rhythm and control over your shots on the course. The correct posture when addressing the ball is composed of 8 different parts (for right hand players, reverse for left hand players):
- Feet: should be shoulder-width apart with approximately 60% of weight on front foot when taking a level lie condition shot; 70% over front foot if hitting from an uphill lie; 50% on each for downhill lies.
- Knees: slightly bent for more flexibility in swing motion; flexing inner thigh muscles to aid stability during impact and prevent sliding away from your desired alignment line.
- Hips & Shoulders: hips and shoulders should be square to target line with left hip slightly higher than right after setup; shoulders just forward of hips; arms down while holding onto club lightly at setup position; arms braced against chest wall.
- Arms & Hands: arms straight but not rigid with elbows pointed out gently away from body; hands directly below chin level with palms facing each other directly across ball-target line; grip pressure should be moderate yet relaxed enough to keep wrists loose during takeaway motion - grips should fit snugly in hands but not overly tight as too much tension will cause undesired results like slicing or "pulled shots".
- Head/neck/chin area: head centered above ball while neck remains relaxed throughout swing; eyes look directly down at ball then continue forward into imagined target space behind it (away from target); chin remains slightly tucked inside collarbone area - important to maintain head posture that won't alter body dynamics off line too drastically throughout entire swing action!
- Backswing Motion: swing must have a full turn with your torso which includes smooth rotation of shoulders - this transition should occur without any jerky motions or effort being exerted by other body parts; use larger muscle groups such as lats rather than smaller ones like biceps in order to create stronger momentum going back. Keep hands quiet.
- Downswing Motion: start by rotating hips first then follow up with torso allowing arms to drop down and not be pulled toward the ball.
- This will allow for a full release while shoulder turn occurs naturally at impact moment - focus on weight shift to left side and bracing of left leg during shift (for right handers) instead of just trying to create speed with your arms.
- Follow-through Motion: let the club follow through all the way over to the target side while maintaining solid posture throughout the swing completion.
Learn the grip
Gripping the club correctly is one of the most important elements of a solid golf swing. An improper grip can make it difficult to hit consistent shots and can even lead to long-term swing faults as you try to correct for problems that a proper grip would help prevent.
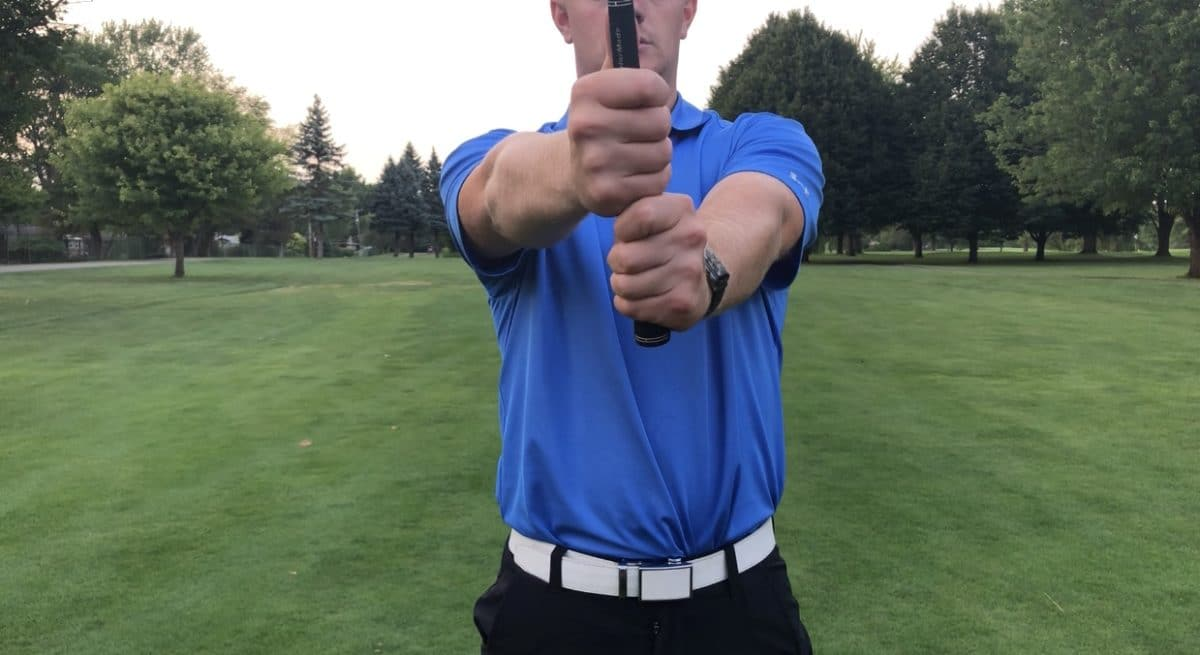
There are three common ways of gripping the golf club: Vardon (overlapping), 10-finger (baseball) and interlocking grip. Each has its benefits and drawbacks, so it's important to understand how each works before deciding which is best for you.
The Vardon or overlapping grip is the most popular, with the little finger of the off hand overlapping between the index and middle fingers on top of the grip.
This creates a secure connection between both hands, helping maintain consistent hand placement throughout your swing.
It also transfers more power directly from your off hand, making it ideal for players who are trying to generate extra club head speed or distance.

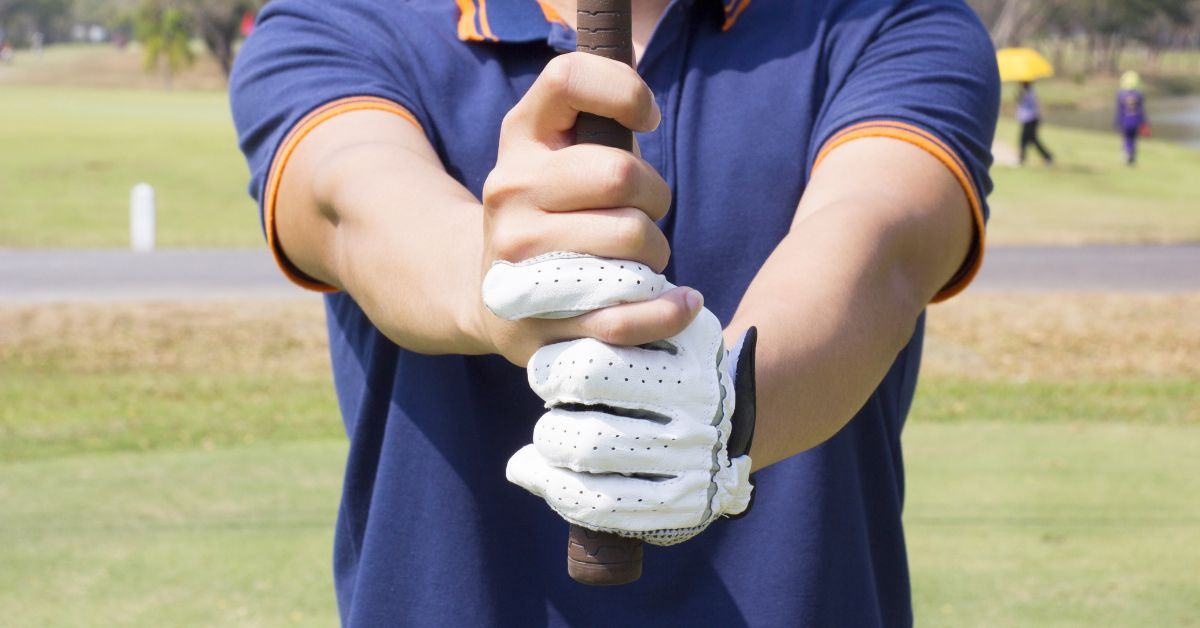
The 10-finger or baseball grip places all ten fingers on the handle with no overlap or interlocking between hands.
This allows each hand to independently control the clubface at address and during impact, making this ideal for beginners who need maximum feel from their hands throughout their swing.
It’s also a great choice for senior players who don’t have as much strength in their wrists and forearms as younger golfers might have but still want maximum control over their ball flight.
The interlocking grip is similar to that of a Vardon except instead of overlapping your fingers together you intertwine them together across top of the club handle like two pieces of string that have been tied together tightly along its length.
This creates an even more secure connection between both hands while still allowing some independent movement with each during impact – providing players with an exquisite blend of power and control over their ball flight trajectory when properly executed!
Swing Positions
Swinging a golf club requires the player to transition through several different positions. Understanding and mastering these positions is essential to developing a good golf swing.
It is important to understand what each position looks like, how it should be correctly executed, and how it should feel. With practice, you can soon make a powerful and consistent swing.
Address position
The golf swing begins with the address position, which is where a golfer stands behind the ball to begin a shot. The address position is designed to provide the golfer with stability and balance throughout the swing.
It should also help generate club-head speed while increasing accuracy. When in the address position, golfers should focus on three key elements: scoreline alignment, spine angle, and posture.
- Scoreline Alignment: The first element of a successful address position involves aligning the clubface parallel to the target line; this is known as setting up with a square club face (or "scoreline" alignment).
- A good check for this alignment is to look at the distance between your left thumb and right thumb when gripping the club - if these two points are roughly equal distance from your target line then you have achieved proper scoreline alignment.
- Spine Angle: The spine angle in an address position can influence many aspects of your swing, notably power and accuracy.
- It's important to maintain a consistent spine angle throughout your practice swings and shots as any deviation can lead to inconsistency in ball flight and shot outcome.
- Make sure that when you set up to take a shot, you don't slump over or stand too upright - both of these could affect your club contact with the ball.
- Posture: The posture of your setup is just as important as other elements in achieving success tee-to-green. Keeping an athletic stance allows maximum mobility during impact while promoting accuracy off of each swing.
- Set yourself up by spreading your feet slightly wider than shoulder width apart from one another with knees bent slightly inward; this will give you better balance and mobility throughout your shots without sacrificing accuracy on impact.
Top of the backswing
The top of the backswing is the position the golfer assumes just prior to beginning the downswing. This is the point of maximum wrists cocking, with full shoulder and hip rotation and weight transfer.
The stance should form an athletic posture with a slight flex in the knees and hips, while maintaining good balance over the feet at this point.
It should be noted that a golfer will get the most distance from their shots during their backswing if they can keep their hands, wrists and arms extended, but not tensed up or locked.
Along with proper body alignment – a straight spine line aligned to target and fingertips pointing towards the ground – an effective top of the backswing requires that all parts of one’s swing are in sync: shoulder turn, free right arm (for right-handed golfers) and hips cleared away from ball-target line.
The head should also remain relatively still during this phase of swing, while keeping eyes focused on ball throughout the swing motion until contact is made.
At this point in the motion, lift your lead foot slightly to keep body balanced across both feet while continuing to rotate shoulders on plane path as much as possible before transitioning into the downswing phase of swing.
Downswing position
The downswing position is the foundation of a successful golf swing. It is where the momentum and power of your swing are generated. At this point in the swing, your arms should be slightly bent with the club face closed and the leading edge pointed down.
Your left shoulder should be slightly lower than your right shoulder and your feet should be pointing at your target line. The key to developing power in this position is keeping your arms close to your body so you can use them to generate centrifugal force.
During the downswing position, it’s important that you keep your back slightly arched as well as keep your hands ahead of the ball so that when you hit it, you will get maximum distance from each shot. To visualize this concept, imagine:
- Taking a small step forward with each arm
- Pushing off from both feet to increase momentum in the downswing motion
As soon as you come into impact, be sure to follow through completely by keeping your head down until after impact has occurred. This will help maintain control and accuracy throughout every shot you take on the course.
Impact position
The impact position is considered by many to be the single most important point in the golf swing. This is where effective force is applied to the golf ball and where maximum clubhead speed is attained, thanks to an ideally timed wrist cock.
In addition to powering the ball, adjusting your body position at impact can also affect the trajectory and spin rate of your shot.
In order to optimize your performance at impact, it is essential that you maintain a consistent setup throughout your entire swing.
Good ball strikers have a tendency to have their spine centered above the ball with their hips tilted slightly toward their target and a natural flex in their knees.
These attributes all lead to proper sequence throughout one’s motion, which results in an efficient release in timing at impact and a solid strike on the ball with the clubface square through contact.
If any part of these fundamentals are neglected it could cause your shot pattern or trajectory to curve away from the desired intended target line.
Follow-through position
The follow-through position marks the completion of the golf swing. After carefully executing your backswing, downswing and impact of the ball, you hold the follow-through position while you’re completing your swing. At this point you are ready to evaluate your shot, just seconds after it was struck.
Though the follow-through looks different for each golfer, there are a few key points that should always remain consistent.
The head of the golfer should stay in line with or slightly behind its starting position at address, as a move forward may indicate a shift in weight transfer on the downswing and subsequently reduce power as well as accuracy.
The grip end of the club will stay focused on carrying through toward the target line with full release through impact.
The left arm (for right-handed golfers) should work to extend away from your body past 90 degrees and retain its shape well into follow-through, signaling that body rotation is engaging through impact and therefore maximum power can be achieved.
The torso will continue to rotate towards the target during this phase of the golf swing completing the shoulder turn initiated at address, plus any additional rotations created by the power generating hips.
Common Golf Swing Errors
Let's explore some of the more common mistakes to be aware of when it comes to positioning your body for a golf swing:
Slouching in the address position
Slouching in the address position is one of the most common mistakes in a golf swing position. This occurs when a golfer's weight is too far forward, usually causing the spine angle to become more upright or even leaning back.
This shift of weight will cause a golfer to have difficulty developing power and distance with their shots, and may also lead to joint pain and fatigue due to the unnatural position.
In order to maintain good posture at address, a golfer's spine should have a slight tilt away from the target while maintaining both flexion in the legs and slight flexion in the base of their back.
Additionally, arms should be loose but not floppy, and centered over both feet. While maintaining this posture, your head should be slightly above your shoulders and eyes level with your belt buckle.
At this point you are ready to build your golf swing around these established fundamentals, rather than try to fix an awkward posture while in mid-swing.
Reaching too far in the backswing
Making a full turn in the backswing is necessary for power, but it is possible to over-reach. That mistake in your swing will cause a slice and loss of distance.
Reaching too far can also change the angle of your grip which causes the clubface to remain open. The result is an inefficient shot with poor contact with the ball and too much side spin – leading to a poor result.
Every player’s swing arc is unique, so there is no one answer for how far you should reach back. Beginners can use the rule of thumb described below as they learn the motion of their swing and practice consistency:
- Grip down on your club’s shaft to gage where you should position your hands at address
- Keep arms close to body when making your backswing
- Stop at 90° elbow flexion for shorter clubs (ore closer for longer clubs)
- Your wrist joint should be in line with forearm at top of backswing
- Weight shift should take place at hip joint during turning phase
- Keep shoulder turn focused against movement of opposite shoulder’s hip turn
- Let hips relax and initiate beginning phase of downswing when weight has shifted from rear foot onto front foot
By keeping your body loose and remaining aware of where each joint should be positioned, you will be able to keep this mistake from creeping into your golf swing. Controlling and fine tuning these positions until they are comfortable can help you see considerable improvement in your golf game.
Lifting the head in the downswing
Many amateur golfers make the mistake of lifting their head while performing the golf downswing. This is often referred to as “fighting the pivot” or “casting” and it can have negative effects on your ball striking and performance.
When you lift your head during the downswing, it shifts your body weight posture and causes you to lose balance, particularly around impact of the clubface with the ball.
Your upper body then pulls away from the target at impact, resulting in what's likely an extended shot with a draw or slice shape instead of a straight ball flight from the intended target line.
To maintain good form and avoid lifting your head in the downswing, be sure to keep your spine angle at address constant throughout the swing motion. You should also ensure that you stay behind the ball as it travels downward throughout back swing, downswing, through-swing and into follow-through.
Swaying in the impact position
One of the most common golf swing mistakes is swaying in the impact position. Staying still is vital for making a quality golf shot, but many beginners try to get extra distance by swaying or bending their body at the impact point. This drastically reduces the consistency and accuracy of your shots.
The best way to prevent swaying is to focus on keeping your upper body still throughout your entire downswing. This means that you should practice proper posture and make sure your elbows are close together at impact.
Keeping your arms held close makes it more difficult for you to move laterally, instead allowing you to drive power forward with a straight line of energy from your hands toward the ball.
Mastering this technique will not only reduce slices and pulls, but also help you hit longer golf shots more consistently.
Not finishing the follow-through
One of the most frequent errors in a golfer's swing is not finishing the follow-through. This happens when you start well, but you don't complete the swing and the swing is stopped partway through the follow-through.
The result can be an incomplete golf shot that is inconsistent, inaccurate and lacking power.
Not finishing your follow-through can occur for several reasons, such as:
- Hesitating during your backswing which leads to not accelerating onto impact fully.
- Tensing up during your downswing leading to a jerky motion on impact rather than a smooth flow through the motion.
- Looking ahead at the intended target instead of maintaining good posture and vision of the ball at address.
To avoid these types of errors, focus on having a full turn in your backswing combined with good posture and alignment throughout your setup and stance.
Taking several shallow swings to help warm up before every round can help you condition yourself to better feel this finish as well as increase awareness as to why it's important to allow yourself enough time to do it right and get into proper position for impact in order for maximum power and accuracy throughout every shot!
Golf Swing Tips for Improvement
We’ll look at some tips to help you improve your golf swing positions and help you create a great golf swing:
Practice with a mirror
Improving your golf swing position can be challenging, yet with practice, you can master it. It is important to recognize bad habits and strive to make them better.
One useful tool is a mirror in which you can measure your form and develop a plan of attack on how to improve.
When facing the mirror, carefully observe where your lead arm should be at the apex of your swing. Your left arm (right-handed golfer) should remain in front of your body while the right arm extends beneath it in the follow through phase.
This proper forearm alignment will help eliminate a hook-slice tendency and ensure a smooth straight ball flight.
To ensure this position, add an object (e.g., club head cover) between your arms so that there's slight tension created between them during the follow through phase.
In addition to proper hand placement positioning, use the mirror to check hip position as well as leg angles throughout the entire swing sequence from set-up to finish.
You'll want to check whether both hips are even at address, knee flex during backswing as well as foot positioning when turning into impact position and balance on finish position which is critical for accuracy and distance control during shots on course for complete swings results.
Record your swing
Recording your golf swing motions can help you diagnose issues in your game and identify areas for improvement. By capturing a slow motion, step-by-step visual of your swing, you can more easily spot mistakes and optimize the parts of your game that are most important to you. Recording also provides an incredibly helpful tool if you decide to take up golf lessons.
Use a golf trainer
Using a golf trainer is an effective way to improve your swing. There are many types of trainers available on the market, each designed to help you improve your form and accuracy.
A good golf trainer will record your swing in slow motion and provide feedback on improvements that can be made in form, posture, and technique.
Swing trainers also allow you to view different angles so that you can evaluate how any part of your body should be at each point of the swing.
Many golf trainers come equipped with adjustable weights that let you customize how much resistance there is at different points of the swing; this helps ensure that even subtle mistakes don’t go unnoticed.
Additionally, some trainers offer detailed diagnostics of where and why specific weaknesses occur in your golf game; such as analyzing poor clubface alignment or generating deep data metrics like angle of attack and angle of face closure through a range finder tool or launch monitor systems to further improve accuracy and power.
Take lessons from a pro
Taking regular professional golf lessons can be one of the most beneficial ways to improve your golf game. A professional coach will break down your entire swing and build it back up piece by piece using drills, muscle memory exercises, posture corrections and analysis of numerous angles.
Your coach may use video to help give you a better idea of what you are doing wrong and what improvements need to be made.
Your swings will be compared with those of successful touring professionals in order to give you a mental image that reflects your improved technique. Working with an instructor over a period of time can help you eliminate ingrained swing flaws that can't be the corrected through theory alone.
Investing in lessons from a qualified pro is often worth the time, effort and expenses; resulting in lower scores or greater satisfaction from every round you play.
Use visualization techniques
Visualization is a powerful mental tool that can be used to improve your basic golf swing positions. Visualizing yourself performing a proper golf swing with perfect positions can be key to achieving a better game.
When visualizing your golf swing, try to focus on what the proper positions should be in each part of the swing. Where should your arms and hands be positioned? How should your hips and torso move during the backswing? How does this differ from the forward swing?
Take time to observe where you are struggling in each part of the golf swing and use visualization techniques to practice positions for improvement.
It can also help you to become aware of any bad habits that you may have picked up when practicing, such as leaning back too far, stepping in too quickly or if your left foot or right foot are out of position.
Think about which muscles need to work together for each position during the golf swing and visualize performing those movements correctly every time before hitting the ball.
This will help develop greater body awareness during your swings as well as increase confidence in knowing that your positions are correct before attempting them on the course. Visualization is an effective way of learning how to perform better on the course by building muscle memory and improving overall technique.
Thank you for visiting, and we hope to see you back soon!
 Edwin Betancourt